Hosting a mail server can be surprisingly complex, often requiring a dedicated machine for optimal performance. A VPS is highly recommended due to the following reasons:
- Your mail needs to be available 24/7.
- A whole server is necessary to manage the demands of mail hosting.
Mail-in-a-Box works seamlessly and offers excellent features like system reports, statistics, and built-in monitoring. This guide is tailored for Ubuntu and Namecheap, but it should also work with Debian and other DNS providers.
Note: The intended setup involves using a local DNS server, but I prefer not to rely on one for managing all my DNS settings.
Obtaining a Domain
This step is pretty straightforward—just go to Namecheap or your preferred domain registrar and purchase a domain. For this guide, I'll be using example.com.
Recommended TLDs:
- Known Good TLDs:
.com,.email,.fund,.guide,.info,.io,.me,.net,.uk,.us - Probably Good TLDs:
.computer,.cz,.eu,.im,.name,.network,.nz - Avoid These:
.at,.ca,.de,.gg,.je,.as,.cx,.is,.nl,.bid,.buzz,.click,.cyou,.date,.faith,.fit,.fun,.gdn,.icu,.life,.online,.ooo,.pro,.review,.site,.space,.stream,.top,.trade,.vip,.work,.world,.xyz
Mail-in-a-Box Deployment
After obtaining a domain and a VPS with Ubuntu 22.04 installed, run the following command:
curl -s https://mailinabox.email/setup.sh | sudo bash
Follow the installation prompts. When asked for a hostname, use:
mail.example.com
From this point, the setup begins to get a bit tricky. Start by creating a DNS A Record for mail.example.comand also set up reverse DNS (rDNS or PTR Record) for both IPv4 and IPv6.
While it’s possible to run without rDNS for the IPv6 address, it’s highly recommended to configure it.
DNS Setup
Here, I’ll show you the minimal DNS configuration required for your mail server to score 10/10 on mail testers and spam testers.
First of all, log into your Namecheap account and navigate to your dashboard
Then click on your domain and select Advanced DNS then just click on Add a new record and follow the template below
This section will use local IPv4 and IPv6 as examples.
The structure should be like this
+-------------------+
|    DNS Settings    |
+-------------------+
| Domain Name       | example.com    |
| Record Type       | A              |
| IP Address        | 192.168.88.8   |
| TTL               | 3600           |
+-------------------+
Required DNS Records
- A Records (for IPv4):
- autoconfig:
192.168.88.8 - autodiscover:
192.168.88.8 - mail:
192.168.88.8 - mta-sts:
192.168.88.8 - mta-sts.mail:
192.168.88.8 - www:
192.168.88.8
- autoconfig:
- AAAA Records (for IPv6):
- autoconfig:
2b01:1243:1:723::84c2 - autodiscover:
2b01:1243:1:723::84c2 - mail:
2b01:1243:1:723::84c2 - mta-sts:
2b01:1243:1:723::84c2 - mta-sts.mail:
2b01:1243:1:723::84c2 - www:
2b01:1243:1:723::84c2
- autoconfig:
- TXT Records:
- @:
v=spf1 a mx ip4:192.168.88.8 ~all - _dmarc:
v=DMARC1; p=quarantine - mail._domainkey:
DKIM1; h=sha256; k=rsa; s=email; A$xz%jKrCdiYnOohH+}gMx)_vfxX|mMQBBJ|DQ?>=-F\b4mJuqE!8-5.ZBbDyAq}?LDR?Hy40]\CMYp!6eV*=HL[wbS\yHK8tY%ngGJ3K_8t9*&q.-?I%xlQM4A)DO]x7b%jbA4,4%8#V[fX,/EL5dAQITH)-dg(6][i0FkV>Ykl1f;hliUk#R?ICC>5/n5=&qQF)JDwv\KmM#2sY%V,RI(T3%-$$SHR2l5oUJYb3Eas++&T*w,y@U8{S0Y@0$-qT9S#zV9!7$SO27#*bisPh[>\q}o]L0tRNfAr<g!wAbDDyp;exaZ!udc?*s4iuCyzh3?An-LIOc-5LA3XpkrssKY$h1#Lj5kObYXHF%$,b!8Uu7ZwDg/]yW?f(%8Okk
- @:
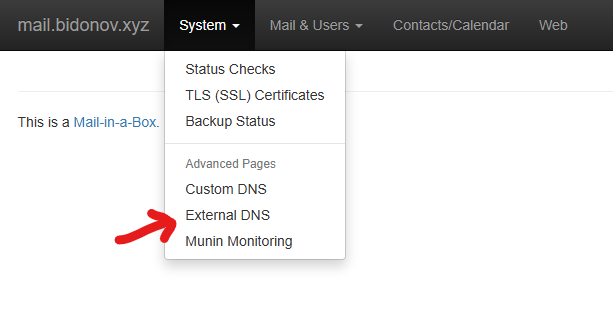
The third TXT record is the so-called "DKIM Certificate." You will find the key and everything you need in the external DNS tab in your Mail-in-a-Box admin page.

Make sure that the PTR record of your IP address matches the FQDN of your Mail-in-a-box host: This record is usually set at the provider you leased the IP address (server) from. Please make sure that you create the record for IPv4 and IPv6 address (if you are using IPv6)!
This setup should ensure that your mail server is functional and scores 10/10 in mail and spam testers.
Intended DNS Setup (Local DNS)
The easiest way to set up your mail DNS is by using the built-in local DNS server. To do this, go to your domain name registrar and change the nameservers to the ones provided by Mail-in-a-Box.
For instance, with Namecheap, navigate to:
- Dashboard → Manage
There you will see the "NAMESERVERS" option with a dropdown menu. Select "Custom DNS" and configure it as shown below:


Keep in mind that it's ns1.mail.example.com in my case; this will differ for your domain.
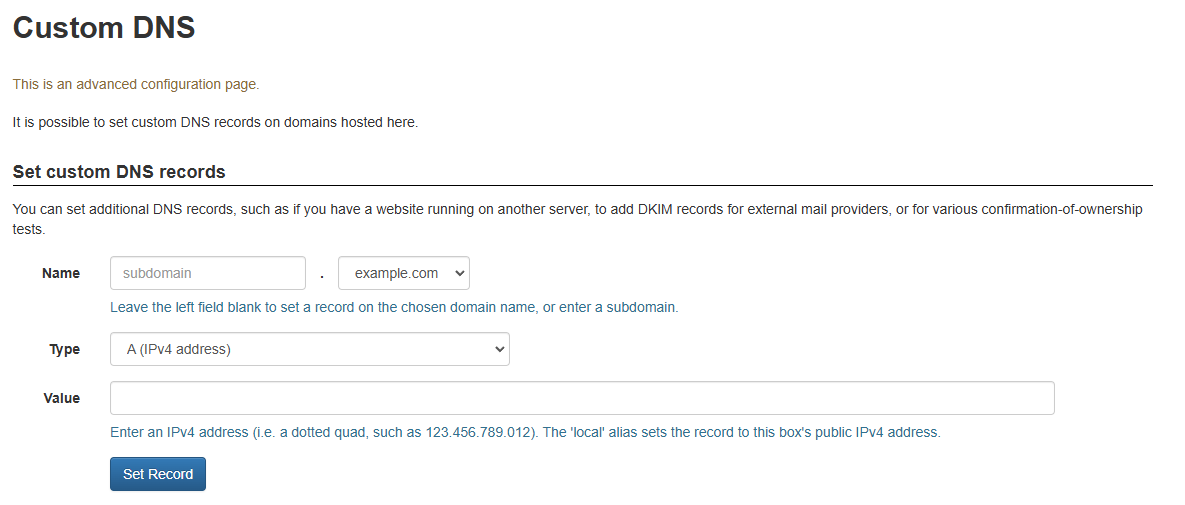
Once configured, you’re ready to use your new mail server with local DNS. If you want to add a new record, such as for your wiki.js server, you can do this by navigating to:
Admin Page → System → Custom DNS

Conclusion
Setting up your own mail server with Mail-in-a-Box may seem daunting at first, but with the right guidance, it can be a straightforward and rewarding experience. By following this guide, you should now have a fully functional mail server that is capable of sending and receiving emails securely. Not only do you gain full control over your email, but you also enhance your technical skills along the way.
Whether you’re doing this for personal use or as part of a larger project, having your own mail server opens up new possibilities for managing your communications. Plus, with the built-in features like system reports and monitoring, you’ll always stay informed about your mail server’s performance.