UFW (Uncomplicated Firewall) is a Linux utility for managing firewall rules.
It provides a simplified interface for managing iptables, allowing users to easily configure and manage network security settings without learning the complex syntax of iptables commands.
UFW is included with many Linux distributions by default, including Ubuntu, Debian, and some other Debian-based distributions. However, it can also be installed on other Linux systems if it is not already included.
If you prefer directly manipulating your firewall's rules, check our essential iptables guide here.
Using IPv6 with UFW
Your AlphaVPS service comes with included IPv6 connectivity.
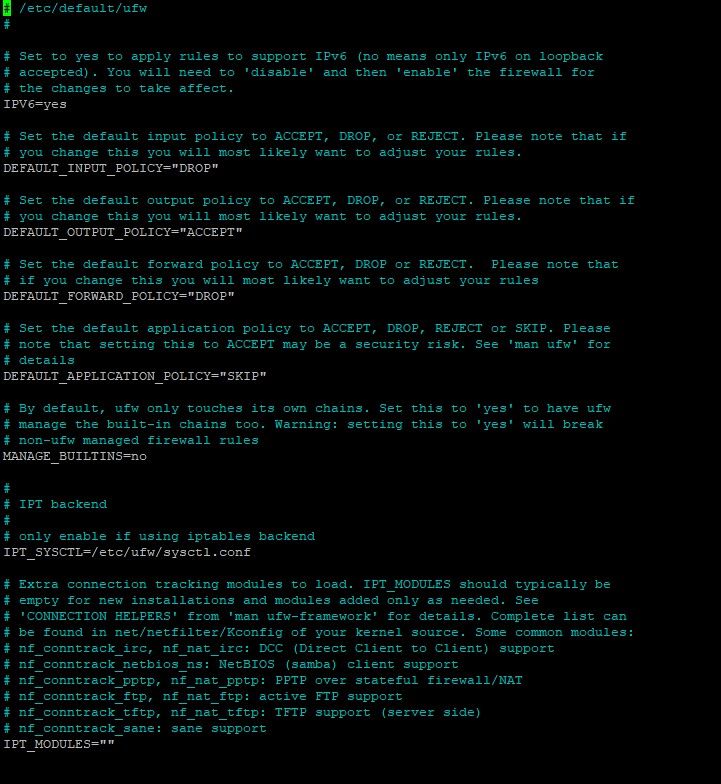
IPv6 support for UFW is enabled by default. This ensures that your firewall rules are added for IPv6 as well.
Starting UFW
UFW can be started by running the following command:
sudo ufw enableThis ensures that your firewall is active and enabled to start on boot.
If you want to stop it, simply run:
sudo ufw disableBefore activating your firewall, we advise setting up your firewall rules first.
Otherwise, directly setting firewall rules via a remote connection while ufw is active may lead to accidental lock-outs.
For example, if you set your default policy directly to deny without an added exception, this will severe your ssh connection. If this happens, you will need to log in via the console in your clients' area panel and disable the rule.
The UFW configuration file can be found in the /etc/default/ directory.
Type nano /etc/default/ufw to open the configuration file.
You can check the status of UFW and the currently-active rules by running:
sudo ufw status
or
sudo ufw status verboseDefault Policies
The default policies of your firewall are rules that handle the traffic that does not explicitly match your other rules. Initially, UFW denies all incoming connections and allows all outgoing connections.
Your default policies can be set with the following example commands:
sudo ufw default deny incoming
sudo ufw default allow outgoing
Allowing SSH Connections
If you have set your default Input policy to DENY, all incoming connections, including SSH or HTTP, will be rejected. If you want to access your AlphaVPS service remotely, you will need to allow incoming SSH connections.
This can be done by running the following command:
sudo ufw allow ssh
This will enable SSH connection on your default SSH port.
Of course, instead of ssh you can directly specify the port, which does absolutely the same.
sudo ufw allow 22
If you have modified your SSH configuration and changed your port to a different one, you will have to specify it as in the command below.
sudo ufw allow 2225Now that incoming ssh connections are enabled, you can safely enable UFW.
sudo ufw enableYou can also allow ssh connection to be established only from specific IPs.
An example command is:
sudo ufw allow from "ip-address-here" to any port 22Allowing Other Connections
Specific IP address
If you want to allow connections from a specific IP address, you can run the following command:
sudo ufw allow from "ip-address-here"You are also able to specify which port can the IP address access:
sudo ufw allow from "ip-address-here" to any port "port-number-here"Specific subnet
If you want to allow connection from a whole subnet, you can specify it by running the following command:
sudo ufw allow from "ip-address-subnet-here"/"prefix-length"
#example sudo ufw allow from 1.1.1.1/24
You are also able to specify which port can the subnet access:
sudo ufw allow from "ip-address-subnet-here"/"prefix-length" to any port "port-number-here"Allowing HTTP/HTTPS Connections
- from everywhere
ufw allow 80,443- from a specific IP address
sudo ufw allow from "ip-address-here" to any port 80,443- from a specific subnet
sudo ufw allow from "ip-address-subnet-here"/"prefix-length" to any port 80,443Rejecting Connections
By default, UFW is configured to deny all incoming connections.
If for some reason, you have changed this default policy to accept them and want to add connections that need to be rejected, you can specify rules, which reject connections from specific IP addresses, subnets, or ports. This is done similarly to the "allow" rules specified above.
Instead of "allow", you must type "deny".
From a specific IP address
sudo ufw deny from "ip-address-here"- specific port
sudo ufw deny from "ip-address-here" to any port "port-number-here"From a specific subnet
sudo ufw deny from "ip-address-subnet-here"/"prefix-length"- specific port
sudo ufw deny from "ip-address-subnet-here"/"prefix-length" to any port "port-number-here"Deleting Rules
Of course, UFW's firewall rules can be deleted.
Firewall rules can be deleted by either their number or by directly referring to the rule.
If you want to see your firewall rules with their respective number, you can run the following command:
sudo ufw status numberedEach rule has its number wrapped in brackets.
You can delete the rule by running:
sudo ufw delete 'rule-number-here'
Alternatively, you can also delete the rule by passing a direct reference to it:
sudo ufw delete allow http
sudo ufw delete allow 80
If you want to reset all of your firewall rules, you can use the following command:
sudo ufw resetThis will reset your firewall to its initial state.
All changed default policies will be reverted and all custom rules will be deleted.
Application profiles
Application profiles in UFW are predefined sets of firewall rules that can be applied to specific applications.
UFW comes with several application profiles pre-installed. We can list them by running:
sudo ufw app listYou will receive a similar output:
Available applications:
  Apache
  Apache Full
  Apache Secure
  OpenSSH
The "Apache" profile allows incoming traffic on ports 80 (HTTP) and 443 (HTTPS), while blocking all other traffic.
The "OpenSSH" profile allows incoming traffic on port 22 (SSH) while blocking all other traffic
You can enable a profile by simply running the following:
sufo ufw allow "profile-name"
#example sudo ufw allow Apache
You are also able to create your own custom profiles by defining a set of firewall rules for a specific application and saving them as a profile file in the /etc/ufw/applications.d directory.
This is done by creating a file in the /etc/ufw/applications.d directory.
Enabling the custom profile is done by referring to the filename with the command above. Make sure that you name your file conveniently.
cd /etc/ufw/applications.d
sudo mkdir MyApp
Before defining the rules in your file, it would be a good idea to check what ports is your application using. You can refer to the application documentation for this.
An example profile file is:
[ProfileName]
title=Custom Application Profile
description=Allow incoming traffic for our application
ports=80/tcp,443/tcp
protocols=tcp,udp
The title field provides a descriptive name for the profile, which will be displayed when viewing the UFW rules.
The description field provides information about the profile and its purpose.
The ports field lists the ports that the application uses.
The protocols field specifies which protocols the application uses.
Specific IPs or Subnets
To enable connections from or to specific IP addresses, you can add the following lines to your profile file.
from="ip-address-here"
to="ip-address-here"
In the same way, you can also add whole subnets:
from="ip-address-subnet-here"/"prefix-length"
to="ip-address-subnet-here"/"prefix-length"