> ## Content Index
> Fetch the complete content index at: https://blog.alphavps.com/llms.txt
> Use this file to discover other available public pages before exploring further.
# Managing Apache Servers: A Comprehensive .htaccess Tutorial
- URL: https://blog.alphavps.com/htaccess/
- Published: 2023-04-26T13:03:45.000Z
- Updated: 2026-03-16T13:21:23.000Z
- Author: Vladislav Peev
- Tags: Tutorials, Web Servers, CMS & Websites
.htaccess is a powerful tool that allows you to configure various settings for your website. It is commonly used on Apache web servers to control various aspects of website access and security. The file can be used to specify access control rules, rewrite URLs, and more.
Htaccess is short for Hypertext Access.
Some common uses of `.htaccess` are:
- Setting up password protection for a directory or web page
- Redirecting URLs to different pages or domains
- Blocking access to specific IP addresses or ranges
The `.htaccess` file is often placed in the root directory of a website. When a request to the web server is performed, Apache checks the `.htaccess` file to see if there are any rules or directives that apply to the requested URL.
In this tutorial, we'll cover the basics of creating and editing the file and applying advanced configurations like URL rewriting, authentication, and caching.
---
## Enabling .htaccess files
`.htaccess` files are only utilized with an Apache webserver.
If you have not installed Apache on your AlphaVPS service, you can do so via the following commands:
- **Debian/Ubuntu**
```
sudo apt install apache2
```
- **CentOS/AlmaLinux** (RHEL-based distributions)
```
sudo yum install httpd
```
We will need to enable the use of `.htaccess` files by modifying the configuration file of our Apache webserver. Depending on your OS, it is either found in the `/etc/apache2` or `/etc/httpd` directory. It is named either `apache2.conf` or `httpd.conf`.
Open the configuration via your preferred text editor.
```
nano /etc/apache2/apache2.conf
```
Locate the section that starts with `` and contains the directory path for the directory you want to allow .htaccess files in.
For example, if you want to allow `.htaccess` files in the `/var/www/html` directory, you would look for a section that looks like this:
```
Options Indexes FollowSymLinks
AllowOverride None
Require all granted
```
The `AllowOverride` line controls which directives in `.htaccess` files are allowed to override the main Apache configuration. Change this line to `All` to allow all directives in .htaccess files.
```
AllowOverride All
```
Save the configuration file, exit, and restart Apache via:
```
sudo systemctl restart apache2
```
## Example .htaccess file
```
# Enable mod_rewrite
RewriteEngine On
# Redirect all traffic to HTTPS
RewriteCond %{HTTPS} off
RewriteRule ^(.*)$ https://%{HTTP_HOST}%{REQUEST_URI} [L,R=301]
# Set default character set
AddDefaultCharset UTF-8
# Enable browser caching
ExpiresActive On
ExpiresDefault "access plus 1 month"
ExpiresByType image/jpg "access plus 1 year"
ExpiresByType image/jpeg "access plus 1 year"
ExpiresByType text/css "access plus 1 month"
ExpiresByType text/javascript "access plus 1 month"
ExpiresByType application/javascript "access plus 1 month"
# Deny access to .htaccess and other sensitive files
Order allow,deny
Deny from all
# Password protect directory
AuthType Basic
AuthName "Restricted Area"
AuthUserFile /path/to/.htpasswd
Require valid-user
```
## Creating a file
As we noted, the `.htaccess` file is usually located in the root directory of your website. The root directory is the top-level directory that contains all the files and subdirectories for your website.
Your website folders are usually stored in your web-root directory. It can be accessed by running:
```
cd /var/www
```
When you place the .htaccess file in the root directory of a website, it will apply to the entire website. If you place the file in a subdirectory, it will only apply to that directory and its subdirectories.
You can create a new `.htaccess` file on your local computer and upload it with your other website files, or you can directly create it via the CLI by running:
```
sudo touch .htaccess
```
**NOTE**: Make sure that permissions are correctly set and that the file is in the desired directory. Do not forget the trailing `.` in the name. This means that the file is hidden. The file can be properly visualized by adding the `-h` flag to the `ls` command.
```
ls -lah
```
## Setting up password authentication
One of the most common use cases for `.htaccess` is setting up access restrictions.
You will need to create a file named .htpasswd that contains the username and password for each user you want to allow access to the directory. You can use a tool like `htpasswd` to generate the password file, or you can create it manually.
We will guide you through both options.
### Manual creation
First, you will need to create a new empty file and name it `.htpasswd`.
You can create it in a directory of your own preference, but you will need to point the path to it in your `.htaccess` file. Make sure that it is a secure location inaccessible from the web.
The username and password are set in the file in the following format:
```
username:password
```
Of course, storing the data in plain text format is not a good idea at all. You can encrypt the password using the `htpasswd` utility. To use `htpasswd` to encrypt the password, run following command in your CLI:
```
htpasswd -nb username password
```
- **username** and **password** are variables for your actual values.
A similar output will be provided.
```
username:$apr1$gLn56B9N$q/va9eGI3DbC0yrtJdH4M.
```
Copy your output and replace the contents of `.htpasswd` file with it.
### Automatic creation
You can also create the `.htpasswd` file via the `htpasswd` utility.
Navigate to the desired directory and run the following command:
```
htpasswd -c .htpasswd username
```
- **username** is a variable for your actual value.
You will be prompted to add a password and confirm it.
Once this is done, the `.htpasswd` file will be generated.
**NOTE**: The `-c` flag creates the `htpasswd` only if it is not already available in the specified directory. If the file is existing, you are able to use the `htpasswd` utility to add additional users to that same file.
### Configuration
You will need to add the following lines to your `.htaccess` file:
```
AuthType Basic
AuthName "Restricted Area"
AuthUserFile /path/to/.htpasswd
Require valid-user
```
`/path/to/.htpasswd` needs to be replaced with the actual **absolute** path to your .htpasswd file.
Save, exit, and restart Apache again via the following command:
```
sudo systemctl restart apache2
```
In our case, we've put our `.htaccess` file in a `testdir` directory in our webroot.
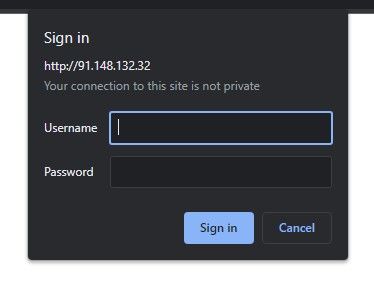
Once we try to access our VPS via our IP and provide the path to our protected directory, we will be presented with a prompt for our credentials.
## URL Rewriting
URL rewriting is a powerful feature of `.htaccess` that allows you to modify the URLs of your website. This can be useful for improving the user experience, optimizing your site for search engines, or simplifying the structure of your site.
This `.htaccess` functionality allows you to redirect URLs, hide file extensions, and many more.
URL rewriting is accomplished using the `mod_rewrite` module in Apache.
You can enable `mod_rewrite` by running the following command:
```
sudo a2enmod rewrite
```
Eventually, it can be disabled by running:
```
$ sudo a2dismod rewrite
```
### URL redirecting
To configure URL redirecting using **.htaccess,** you can use the RewriteRule directive. Here is an example of how to redirect a URL via `.htaccess` configuration:
```
RewriteEngine On
RewriteRule ^old-domain.com$ /new-domain.com [R=301,L]
```
`old-domain` and `new-domain` are variables for your own URLs.
You can redirect either a single page or a whole website. This is useful when you want to redirect your visitors after you have moved to a new domain or you have restructured your website's routes.
**Status codes**
HTTP status codes are returned by a server in response to a client request. They provide information about the status of the requested resource.
In our case, the status codes, which concern us are 301 & 302\.
**301** \- indicates that the original URL has permanently moved to a new location, and search engines will update their index accordingly.
**302** \- indicates a temporary move, and search engines will continue to index the original URL.
**How to redirect a page**
You can redirect a single page to another one by adding these lines to your `.htaccess` file.
```
RewriteEngine On
Redirect 301 /old-web-page.html https://www.example-web-site.com/new-web-page.html
```
As you can see, the structure can be modified to match your own preference.
In all cases, make sure that you replace `old-web-page`, `example-web-site`, and `new-web-page`. Correct status codes are very important as well.
If you are willing to redirect your whole website to another one, your configuration would look like this:
```
RewriteEngine On
Redirect 301 https://www.old-example-web-site.com https://www.example-web-site.com
```
**How to redirect a single URL**
Add the following lines to your `.htaccess` file and substitute the placeholder routes with your actual ones:
```
RewriteEngine On
RedirectMatch 301 /old-route/ /new-route/
```
Replace your actual routes with `old-route` and `new-route`. Specify the correct HTTP status code.
This will redirect any request for the `/old-route/` URL path to the `/new-route/` location with the specified HTTP status code. For example, a request to `https://example.com/old-route/` would be redirected to `https://example.com/new-route/`.
**How to redirect a folder**
You are also to redirect a request for a whole subdirectory/folder.
```
RewriteEngine On
RewriteRule ^/?old-folder/(.\*)$ /new-folder/$1 [R,L]
```
You need to replace your folder names.
### Removing file extensions
A common `.htaccess` use case is hiding file extensions. Basically, you will be able to transform `example.com/catalog.html` to `example.com/catalog`.
The benefits of removing the file extension are:
- Cleaner URLs, which are easier to type and remember.
- Make URLs more SEO keyword-friendly.
- You can hide technologies behind your website and change them without any visual changes to your URLs.
File extensions are removed from URLs by using the `RewriteRule` directive with regular expressions to match URLs that include file extensions and redirect them to URLs without the extensions.
- **Removing PHP file extensions**
```
RewriteEngine On
RewriteCond %{REQUEST_FILENAME} !-d
RewriteCond %{REQUEST_FILENAME}.php -f
RewriteRule ^(.*)$ $1.php [L,QSA]
```
- **Removing HTML file extensions**
```
RewriteEngine On
RewriteCond %{REQUEST_FILENAME} !-d
RewriteCond %{REQUEST_FILENAME}.html -f
RewriteRule ^(.*)$ $1.html [L,QSA]
```
These rules use Apache's mod\_rewrite module to rewrite URLs to include the `.php` or `.html` file extension when a request is sent to a URL without it. For example, if you request `example.com/page` and there is a file called `page.php` in the root directory of the website, this rule will rewrite the URL to `example.com/page.php`.
## Limiting IP Access
`.htaccess` can also be used to allow or deny access to your website based on IP addresses or whole IP ranges.
This is possible after enabling the `mod_authz_host` and `mod_authz_core` modules for your Apache webserver.
You can do this by running the following commands:
```
sudo a2enmod authz_host
sudo a2enmod authz_core
```
After enabling the modules, restart Apache via:
```
sudo systemctl restart apache2
```
Once these modules are enabled, you can use `.htaccess` to allow or deny access to your website based on IP addresses, as described in my previous answer.
### Allowing IP access
You can allow access for a specific IP address by adding the following to your `.htaccess` file:
```
order allow,deny
allow from "ip-address-here"
```
You are also able to specify a whole IP range with:
```
order allow,deny
allow from "ip-address-subnet-here"/"prefix-length"
```
### Blocking IP access
You can block access for a specific IP address by adding the following to your `.htaccess` file:
```
order deny,allow
deny from "ip-address-here"
```
A whole range can be specified with:
```
order deny,allow
deny from "ip-address-subnet-here"/"prefix-length"
```
## Redirecting on error
You can use `.htaccess` to redirect to a custom error page by using the `ErrorDocument` directive. This directive allows you to specify a custom page to display in case of a specific error.
This can be done by adding the following lines to your `.htaccess` files and replacing the page names with your own.
```
ErrorDocument 404 /error-404.html
ErrorDocument 500 /error-500.html
```
As you can see the directive allows you to specify a custom error page for different HTTP errors. You can specify multiple HTTP status codes.
For example, if error 404 was encountered, this would directly redirect us to our `error-404.html` file, which is in the same directory, where you will provide your custom error message.