ISO files contain an exact copy of a CD, DVD, or Blu-ray disc (and are compressed into a single file). In Linux, ISOs act as virtual discs, so they can be used like a disc without having to burn it onto physical media. ISOs are particularly useful for developers, system administrators, and VPS users as they allow for faster software deployment and data access.
Mounting ISO files on a Linux VPS makes many things much simpler. You can easily load software repositories, install applications, or test operating system images without ever leaving the command line. This is ideal for remote environments that do not rely on physical media by requiring access to packaged data.
Mounting ISO files also makes backups and recovery tasks simpler. Many system administration and recovery tools come in ISO format. A simple mount command makes it easy to examine or use these tools directly from your VPS while using less time and server resources. In this article, you will learn how to mount ISO files on a Linux VPS using commands from Ubuntu LTS, as well as advanced options, troubleshooting common issues, and other best practices.
Prerequisites for Mounting ISO on Linux VPS
In order to mount an ISO on a Linux VPS, you need admin rights. Always make sure that your user is allowed to run commands using sudo, since distributing a mount requires strict access to the system's file structure. And remember, without this access, the mount command will never work as expected.
Next, you need to make sure the ISO file is on the VPS. You can use scp to upload the ISO, you can download it from the internet with wget, or you can move files from cloud storage. It is important that you verify the path of the ISO file immediately after the transfer is completed. Verify the file location because the mount command will not work if your path is wrong.
Update your Ubuntu LTS system to keep tools and dependencies current. Run:

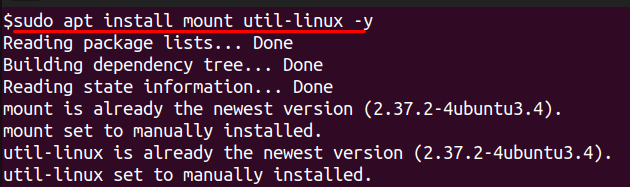
If mount utilities are missing, install them with:
Finally, confirm there is enough disk space and that your chosen directory has proper write permissions to accept the mounted ISO.
Step-by-Step Guide to Mount ISO Files on Linux VPS
Create a Mount Point
A mount point is simply an empty directory where the contents of the ISO will appear after they are attached. You can make a mount point anywhere, but /mnt/iso is a common location since it keeps the mounted media organized. Use this command to make a mount point:
After creating the folder, confirm it exists by running ls /mnt and checking for the new directory.
Mount the ISO File Using Mount Command
Mount the ISO to the directory with the loop option, which treats the ISO as a virtual device:

Here -o loop tells Linux to handle the ISO without physical media. Replace /path/to/your.iso with the actual file path. To check if it mounted correctly, run:

You should now see the files and folders stored inside the ISO.
Unmounting the ISO
When you finish using the ISO, unmount it to free system resources and prevent file lock issues. Run:
This command removes the ISO from the directory but leaves both the file and the mount point intact for later use.
Advanced ISO Mounting Options
Mount ISO as Read/Write
An ISO file mounts as read-only by default because it mirrors a physical disc. If you need to modify the contents, convert it into a writable format first. Tools like genisoimage or mkisofs allow you to rebuild the ISO with write support. After conversion, mount it the same way as before, and the system will let you add or change files. This option is useful for customizing installation media or updating preconfigured environments.
Mount Multiple ISO Files
Linux lets you mount more than one ISO at the same time. You only need to create separate mount points for each file. For example:

Once you have the directories in place, mount each ISO. You get to use the complete path for your mount command, so when you need to use the other ISO in the unstaged directory, you can. This is one way to get at different software packages or installation images without unmounting the ISO that is currently mounted.
Using FuseISO
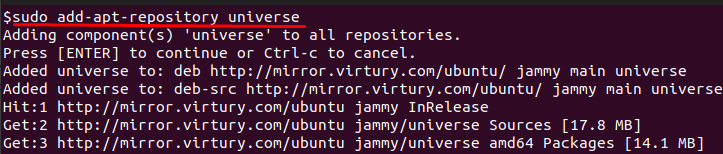
Some more advanced VPS users may also use some other tool like FuseISO. For Ubuntu, you will need to enable the Universe repository in order to be able to install FuseISO. Without first enabling it, the system will report that the package cannot be found.
First, enable the universe repository and update your package list:
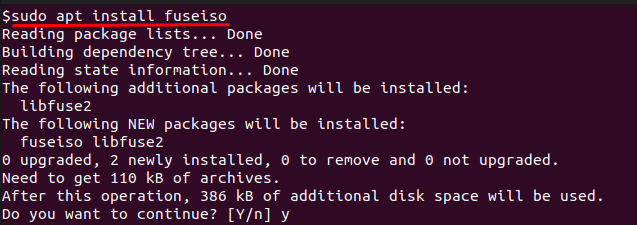
Now install FuseISO:
Then run:

Why use FuseISO instead of mount?
FuseISO provides a way to mount ISO files without having root privileges(which may not be available on some VPS) with some quality-of-life improvements. As it's a part of FUSE(Filesystem in Userspace) it's much more flexible with formats and images and can also be implemented in all kinds of virtual filesystem use-cases.
Conclusion
Mounting ISO files on a Linux VPS is an easy but powerful way to access a configured package, install applications, or recover a system without needing media. With Ubuntu LTS hosting, you can mount an ISO using the following steps: create a mount point, mount the ISO with the loop option, and unmount when finished. You can use /etc/fstab to configure mounting an ISO file longer than one use, so it automatically is remounted on each boot of the VPS.
More advanced options add further ability to VPS users. Writable conversions let you edit the contents of an ISO, multiple mount points allow simultaneous access to different ISO images, and other tools such as FuseISO offer alternate ways to work with and manage virtual disk images. With options such as these, users have complete control over how they work with ISO, making the VPS more efficient and useful for users.
Need a reliable environment to host or mount ISO images for provisioning, testing, or system recovery?
At AlphaVPS, our High-Performance VPS and Ryzen VPS plans deliver fast NVMe storage and excellent network throughput—perfect for working with ISO-based workflows and automated deployments.
If you require more control or need to maintain your own image repositories, our Dedicated Servers and Storage VPS provide dependable, large-capacity infrastructure designed for demanding Linux workloads.
