
If a VPS is being misused by consuming uncontrolled bandwidth, websites can slow down, applications can crash, and you may end up paying costly burst charges for exceeding your allotted bandwidth. If there are multiple services that run on the same domain07 server itself, such as websites, game servers, or seedboxes, if just one process consumes all server bandwidth, then the other services also can't utilize bandwidth, which affects performance and latency, even causing downtime during traffic spikes.
Linux has many great features for throttling bandwidth, unfortunately many of them are complex and difficult to configure. Wondershaper can simplify the process by allowing you to manage your upload and download speed through a single command once the configuration file is created. You get upload and download speed configured simply with one entry and get to manage them with the one command, a great choice for making required speed limits on critical services so that you won't abuse bandwidth.
In this article, you’ll learn how to install and configure Wondershaper, identify the network interface to set limits on upload and download speeds from, test the performance with and without put speed limits, remove the upload and download limits when services are working well again, and how to configure the settings to persist reboots.
What is Wondershaper and Why Use It?
Wondershaper is an easy-to-use Linux tool that you install and then use to apply traffic shaping rules to a specific network interface. It imposes download and upload throughput limits in kilobits per second, so one process can't occupy the entire available bandwidth. Wondershaper is easy to set up and you don't need to have any in depth knowledge of networking.
Wondershaper works well to limit your VPS bandwidth when you need predictable network performance. It ensures that shared bandwidth among multiple services can meet an acceptable standard for Quality of Service (QoS), whether for web servers, game servers, streaming nodes, or seedboxes.
Wondershaper is lightweight; it can be installed on nearly all Linux distributions, and it can be attached or removed with on command. It is easy to utilize Wondershaper for temporary or persistent bandwidth management.
Limiting Bandwidth Usage on VPS with Wondershaper
Step 1 – Install Wondershaper
We will use an Ubuntu VPS for this tutorial, but the same steps work on Debian-based systems. First, update your package list to make sure you are installing the latest available version of Wondershaper. Run this command:

This refreshes the list of software packages on your server. Once it completes, install Wondershaper by typing:

The -y flag automatically confirms installation, so you don’t have to press Y manually. Wait for the installation to finish. T
Step 2 – Identify Your Network Interface
Before applying any bandwidth limit, you must know which network interface your VPS uses for internet traffic. On an Ubuntu VPS, run the following command to list all available interfaces:
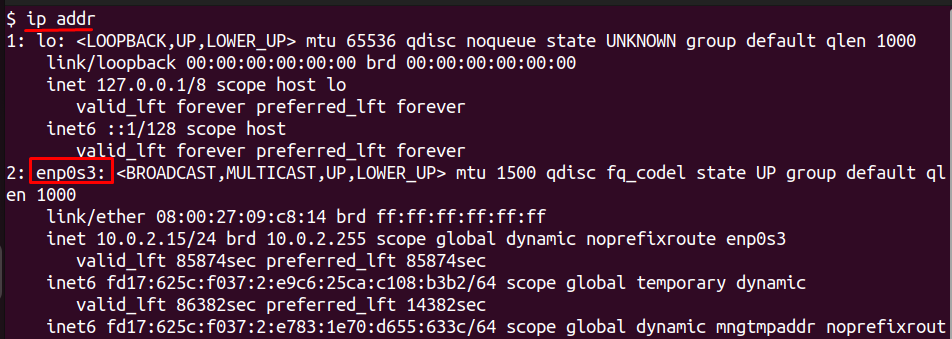
This command will display several entries. Look for the interface that shows an assigned IP address (usually under inet). On VPS servers, the interface name is commonly eth0, ens3, or enp0s3.
In this example, enp0s3 is the active interface. Note this name carefully because you will use it in all Wondershaper commands.
Step 3 – Apply Bandwidth Limit
Once you know the correct interface name, you can set the speed limits using Wondershaper. The syntax requires three values: the interface name, the maximum download speed in kilobits per second, and the maximum upload speed in kilobits per second. Use this command format:
Replace <interface> with the name you identified earlier. For example, if your interface is eth0 and you want to limit download speed to 2 Mbps and upload speed to 1 Mbps, use:
These numbers are in kilobits per second, so 1024 means roughly 1 Mbps. After running the command, the limit is applied immediately, and all traffic through that interface will respect the new speed cap. There is no need to restart the network service or reboot the VPS. This change will stay in effect until you manually remove it.
Step 4 – Test Bandwidth Limit
After applying the speed limit, it is important to confirm that it is working as expected. The simplest way to test is by running a network speed check from within your VPS. If the speedtest-cli tool is not already installed, you can install it by running:

Once installed, run the test with:
This command measures the current download and upload speeds of your server. Compare these results to the limits you set with Wondershaper. If you configured a 2 Mbps download and 1 Mbps upload limit, your measured speeds should be close to those values.
This confirms that Wondershaper is actively shaping traffic on the selected interface. If you still see full speeds, double-check the interface name you used earlier and reapply the command.
Step 5 – Remove or Reset Bandwidth Limits
If you no longer need to restrict your VPS network speed, you can clear the limits instantly. Wondershaper provides a simple command to restore full bandwidth on the selected interface. Use the following syntax:
Replace <interface> with the same interface name you used when applying the limit. For example, if your interface is eth0, run:

This immediately removes the upload and download caps, returning your network to its original speed. You do not need to reboot or restart any services for the change to take effect. Always reset the limits once you are done testing or throttling traffic to make sure your VPS can use its full available bandwidth again.
Conclusion
You have learned in this article how to manage network throughput speed on an Ubuntu VPS using the tool Wondershaper. We discussed installing the tool, determining the proper network interface, and applying limits for upload and download speeds (in kilobits per second), testing the application of the limits with a speed test, and when you do not want to apply limits, the clearing of the limits. Each of these steps has been provided in simple commands so that you can follow the steps even if you are inexperienced using Linux.
Reliable bandwidth control starts with dependable infrastructure.
If you’re managing applications or servers that require stable network performance, a High-Performance VPS from AlphaVPS gives you consistent connectivity and NVMe-backed speed — perfect for testing, bandwidth shaping, and hosting multi-service workloads.
For heavier network tasks, our Dedicated Servers provide guaranteed bandwidth and direct control over throughput for advanced QoS setups.
Controlling bandwidth limits, or rate-limiting, at the VPS level will help prevent any single process from causing your VPS to oversaturate the network, allowing websites, game servers, or applications to be usable during periods of heavy client traffic (or game play). Using Wondershaper, it is a relatively quick and simple way to shape network traffic without complicated configurations. So, by reading this article and trying out the instructions in this article, you will be able to manage the usage of bandwidth effectively, and redesign your VPS to provide a reliable and predictable server.
