Having root access gives you unlimited control of a Linux VPS. Anyone with access to the root account can install software, edit configurations, and even remove critical files. While this is useful for administration, it can also backfire if left available.
Hackers typically perform automated brute force attacks to guess root passwords. Since the root account always exists, it is the easiest account to guess. If an attacker was able to find their way to the root account first, they would have complete control of the server, the ability to upload malicious files, steal information, and stop applications.
In this article, I will discuss how to disable the root login over SSH, then how to make a secure sudo user, set up SSH key authentication, and some extra security steps like firewalls and Fail2Ban to further improve the security of your VPS. After all of this, you will have built a solid base for toning a Linux server.
Why Disabling Root Login is Crucial
Root login serves as a direct access point to your VPS. With root access, permissions are unrestricted. Getting root access to a VPS means a compromised system since any unauthorized access gives the intruder unrestricted privileges. In contrast to normal users, root access has no need for privileges, which is why the root user account is the highest value for attackers.
Automated bots or "bad actors" always scan IP ranges for open SSH ports and attempt thousands of password combinations each time. They always try brute force logins on root accounts first because every Linux system has a guaranteed root user account. The more attempts they can make, the greater the chance they will break your weak password. Even with strong passwords, brute force attacks can still consume server resources and add unnecessary load to your server.
When you disable SSH root login, you eliminate an obvious entry point into your VPS. When an attacker attempts to ssh into your server as root and you disable root access, the attacker needs to first guess a valid username before attempting a password login. Thus dramatically improving the chances against intrusion attempts in that manner. This minor adjustment to your access policy provides a very high level of security for your Linux server and is what you should use as recommended in most VPS security guidelines.
Step 1: Create a New Sudo User
Before turning off root login, create a separate user with administrative rights. This ensures you can still manage the VPS after root access is disabled. Use the following command to add a new user:

You will be prompted to set a password and provide optional details. Once the account is created, grant it sudo privileges so it can run administrative commands:

Log out from root and test logging in with the new user. After login, confirm sudo rights by running:

If the output shows root, your configuration is correct. Setting up a sudo user is a key step in VPS security because it separates daily usage from full administrative power, reduces the attack surface, and leaves logs of all privileged actions for better monitoring and accountability.
Step 2: Disable Root Login in SSH Configuration
Once your sudo user is working, the next step is to disable SSH root login. This prevents attackers from targeting the root account directly — one of the most common ways servers get compromised. This is a core part of SSH hardening and overall Linux server security.
First, back up your SSH configuration file so you can restore it if something goes wrong:

Inside the file, find the line that starts with PermitRootLogin. If it’s commented out with #, remove the # and set the value to no:
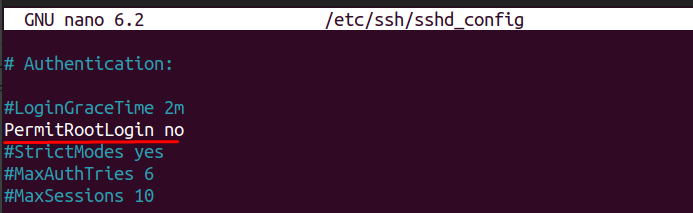
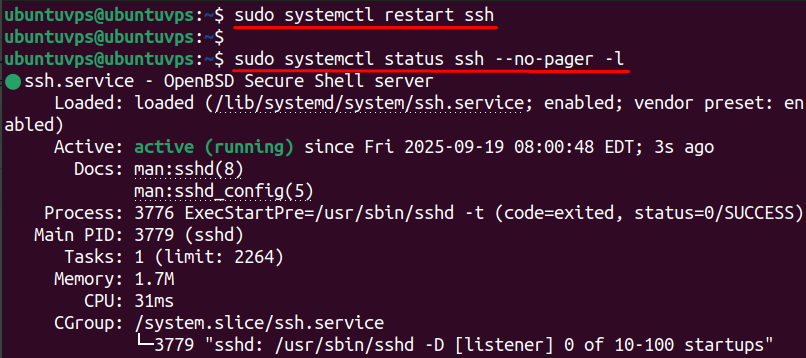
Save and exit (CTRL + O, ENTER, CTRL + X in nano). Before applying the change, run a quick syntax check to make sure there are no errors:

If there’s no output, restart the SSH service to apply changes:
Finally, open a new terminal and try logging in as root:
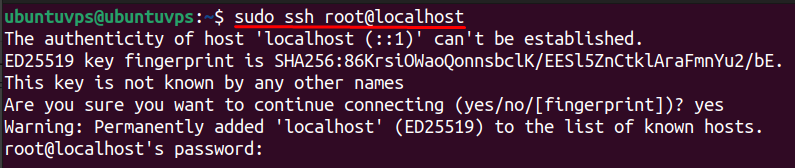
You should see a Permission denied error, confirming root login is disabled. Reconnect using your new sudo user to verify that you still have access. This simple step significantly strengthens VPS security and helps protect against brute-force attacks.
Step 3: Disable Password Authentication and Set up SSH Keys
Disabling password authentication makes your VPS much harder to hack because attackers can no longer guess passwords through brute-force attacks. Instead, you’ll log in using secure SSH key pairs.
1. Generate SSH Key Pair (on Your Local Machine)
Run this command on your local computer (not inside the VPS):
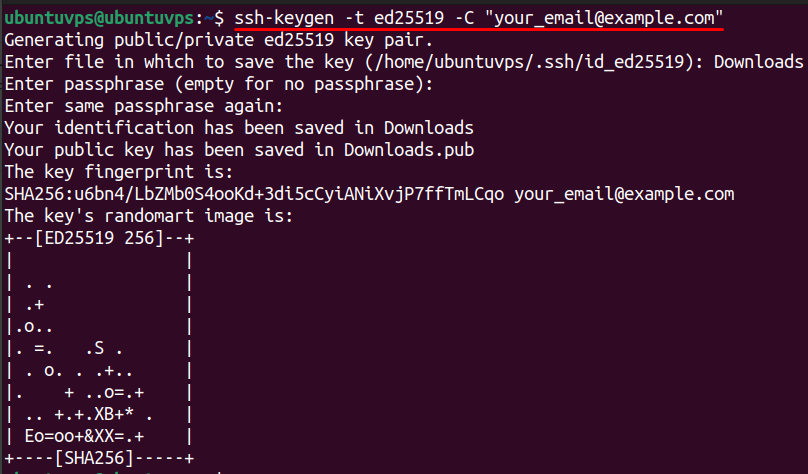
Press ENTER for default file location. Set a passphrase if you want extra protection (recommended). This will create two files:
- id_ed25519 → Your private key (keep it safe, never share).
- id_ed25519.pub → Your public key (you will copy this to the server).
2. Copy Public Key to the Server
Use ssh-copy-id to add your public key to the VPS authorized keys:
Enter your sudo user’s password one last time. After this, your public key is installed and you can log in without typing a password.
3. Test SSH Key Login
Try logging in again:
If you are logged in without being asked for a password, your key authentication is working.
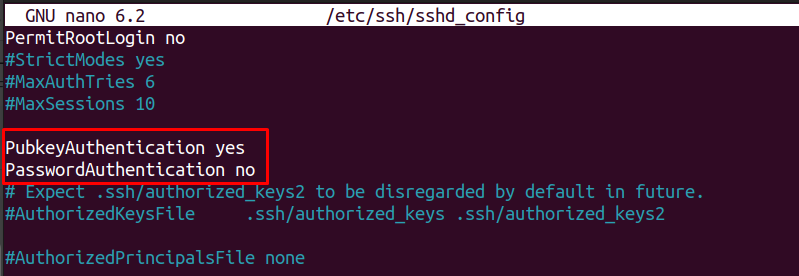
4. Disable Password Authentication and Enable Keys
Now lock down password-based logins:
Find these lines and set them as follows (uncomment if needed):
Save and exit, then restart SSH:

Extra Steps to Strengthen VPS Security
Disabling root login and using SSH keys are strong first steps, but you can harden your VPS even further with a few additional measures. These steps add extra layers of protection against brute-force attacks and unauthorized access.
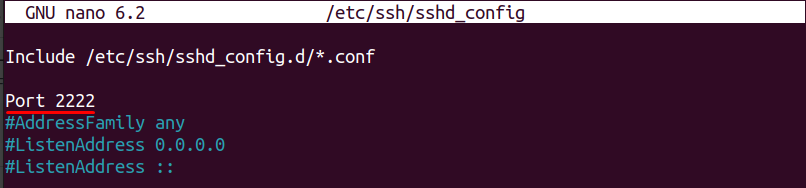
1. Change the Default SSH Port
Attackers often scan port 22 for open SSH services. Moving SSH to a non-standard port reduces unwanted login attempts:
Find the line that starts with #Port 22, remove the #, and change it to:
Save, then restart SSH:

Remember to reconnect using the new port:
2. Enable UFW Firewall
Allow the new SSH port and enable the firewall:
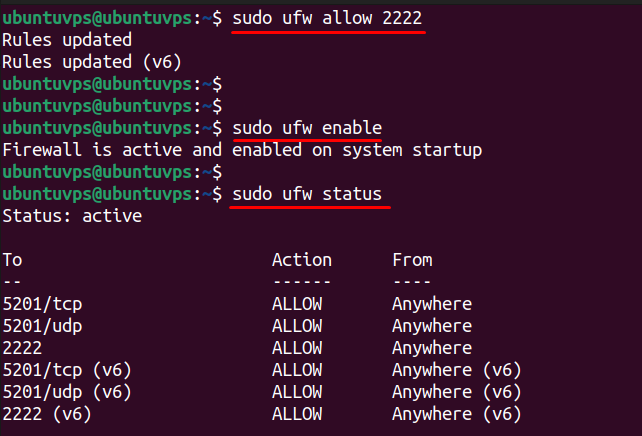
This ensures only approved traffic can access your VPS, improving overall firewall configuration.
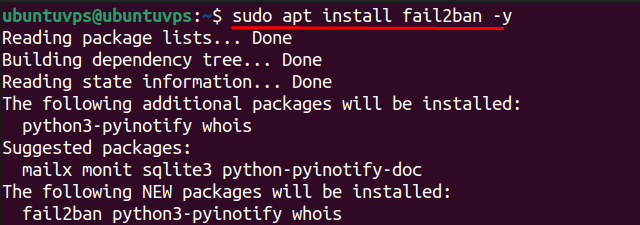
3. Install Fail2Ban
Fail2Ban blocks IPs that try repeated wrong passwords, protecting against brute-force attacks:
You can customize its configuration in /etc/fail2ban/jail.local to set ban times and retry limits.
Conclusion
In this article, the important steps to securing a Linux VPS were covered in relation to removing common attack vectors. Root login allows full access. Therefore, it is the primary vector that automated brute force attacks try to exploit. Creating a distinct sudo user, disabling root login access, setting up SSH keys, can all be implemented to reduce unauthorized access significantly. Each of these allows root access and is still available for administrative functions, but makes the server and system secure from intrusion.
In addition to these primary steps, another layer of security can be implemented, such as, changing the default SSH port, enabling UFW firewall rules, installing Fail2Ban, and potentially setting up two-factor authentication. Collectively these methods can increase VPS security. Following the methodology presented forms a basis of hardening for a Linux server. Adhering to this can minimize brute force attacks, increase robustness of the server overall, and contribute to keeping space secure for your applications and data.
For these security improvements to make the most impact, it’s important that your VPS runs on a reliable and properly managed infrastructure. At AlphaVPS, our Linux VPS plans come with full root access, fast NVMe storage, and consistent uptime — the perfect base for building a secure, hardened server. Whether you’re setting up SSH keys or optimizing firewall rules, a stable VPS environment ensures your security configurations perform as expected.
