
When managing a VPS, you often run the same commands in the same way every day. This could include updating packages, restarting web servers, or following system logs. These commands and processes are crucial. But the longer the command you have to type repeatedly, the longer it takes, and the easier it is to make a mistake.
This is where Bash aliases are very powerful. A Bash alias allows you to quickly create convenience-creating shortcuts and other key commands for execution interactively. For example, instead of having to type an entire command each day, simply create an inexpensive and memorable alias for that command. In this case, you can simply press a few keys to create the result in 1 second or less, repetitively, and without having to slow down your workflow.
In this article, we are going to illustrate how to create, manage, and organize Bash aliases so you'd have a much faster VPS management process, making mistakes less about your work, and server management a lot more productive.
What Are Bash Aliases and Why Use Them on VPS?
A Bash alias is, in essence, a nickname for a single command or a group of commands. Instead of typing out the full command every time you want to execute it, you can give it a name as per your liking and then run it.
When working on a virtual private server (VPS), it is even more useful, as system administrators and developers frequently perform tasks that are repetitive in nature: applying security patches, checking on service status, or reviewing logs for several different servers.
Unlike shell scripts or functions, aliases are incredibly easy to create and allow you to quickly optimize daily tasks you perform on a VPS, while putting in very little effort.
Prerequisites for Setting Up Bash Aliases on VPS
Before creating Bash aliases on your VPS, make sure you have:
- VPS access: A working Linux VPS with SSH access, along with the server’s IP, username, and authentication method (password or SSH key).
- Basic Linux knowledge: Familiarity with navigating directories and using text editors like nano or vim to edit configuration files.
- Proper permissions: Ensure your account has the rights to run the commands you plan to alias; some may require sudo access.
Having these in place ensures smooth and interruption-free alias setup on your VPS.
If you don’t already have a VPS set up, you can deploy one from our Cheap VPS lineup. These are KVM-based, fully virtualized servers with fast NVMe storage and full root access — perfect for experimenting with Linux, learning automation, or setting up a development environment.
How to Create Bash Aliases on VPS
To start creating Bash aliases on your VPS, first connect to the server using SSH. Open a terminal on your local machine and run the command:
ssh username@server-ipReplace username with your actual VPS username and server-ip with the server’s public IP address. SSH is required because most VPS environments are remote systems, and SSH provides a secure, encrypted way to access and manage them from anywhere.
The next step is to decide where you want to store your aliases. The most common location is the .bashrc file inside your home directory. This file automatically loads every time you open a new terminal session. To edit it, use the command:
nano ~/.bashrc
This opens the .bashrc file in the nano editor, allowing you to add new aliases. If you prefer to keep aliases separate for better organization, you can create a .bash_aliases file in the same directory and then include it inside .bashrc using a simple line of code. This keeps things cleaner when you have many aliases in the future.
Now, let’s look at how to define an alias. The basic syntax is:
alias name='command'Here, name is the shortcut you will type, and command is the full command or group of commands you want to run. For example, if you want a quick way to update your server, you can write:
alias update='sudo apt update && sudo apt upgrade -y'
After saving this alias, typing update will run both the update and upgrade commands automatically.
Similarly, you can create a shortcut for listing files with details using:
alias ll='ls -la'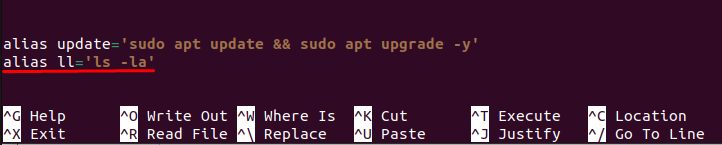
This saves time when you need to view file permissions, sizes, and timestamps in a single view.
Once you add all the aliases you need, save the changes and close the editor. To apply them without logging out, reload the shell configuration using:
source ~/.bashrcThis command forces the shell to read the file again and apply the new settings instantly. From now on, whenever you type one of your aliases, the full command will run in the background, saving you time and effort every day.
Loading and Testing Bash Aliases on VPS
After writing your Bash aliases and loading them into the current shell session, you can perform a system test to see if the alias works by typing the shortcut name in Terminal. For example, you created that update alias, you would just type:
$ update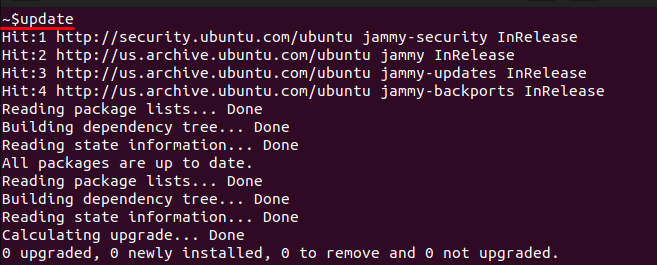
There should be an automatic process to update your system packages. If nothing happens, check your alias syntax in your configuration file or make sure you have reloaded the shell after you edited it. I recommend testing out each alias immediately after creating it. It is a good time to confirm everything is set up properly before proceeding with more advanced configurations.
Advanced Bash Aliases for VPS Automation
When you understand the basic aliases now you can start creating more advanced aliases that save you time and reduce the need to continually type out the same or similar commands repeatedly while administering your VPS. These aliases can chain multiple commands together, automatically pass options, and even assist in server monitoring.
For instance, system logs are often checked multiple times a day. Instead of typing long paths each time, you can create a shortcut like:
alias logs='tail -f /var/log/syslog'
Now, typing logs will instantly start streaming your server logs in real time. Similarly, disk usage can be monitored quickly using:
alias disk='df -h'
This command shows disk space in a human-readable format with a single word:
$ disk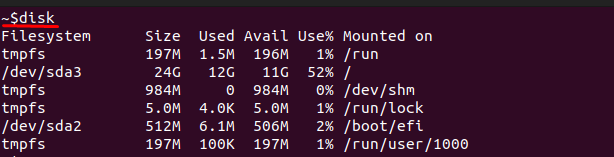
Some tasks require more than just one command. For example, checking available memory and CPU usage together can be simplified by chaining commands:
alias status='free -m && top'Here, the status alias first shows memory details and then opens the process monitor. With such shortcuts, you save time on every login and keep VPS automation simple but effective.
Best Practices and Security Considerations
Using Bash aliases can streamline VPS management, but a few precautions help prevent problems:
- Use clear names: Choose descriptive aliases like update instead of short, cryptic ones like u to avoid confusion.
- Don’t overwrite critical commands: Avoid replacing system commands like rm or shutdown unless you’re certain of the consequences.
- Keep backups: Before editing .bash_aliases or .bashrc, save a backup so you can restore it if needed.
- Be cautious on multi-user VPS: Don’t create aliases that accidentally grant sensitive access. Document aliases properly to maintain both productivity and security.
Conclusion
Bash aliases are one of the most easy, yet powerful, management tools for VPS. A few lines in your shell configuration files can change your long and ugly terminal commands to short and easy-to-remember shortcuts, saving you time, making you less likely to make mistakes, and simply making the everyday management of your server easier, so that you can get on with your day.
We started off by defining bash aliases, looking at how to create them, and emphasizing their importance for VPS users. We then took a look at more advanced methods of automation, some ways to keep everything tidy, and best practices to keep your environment clean and secure. Overall, following these steps to substitute agonizing repetition with simple and streamlined workflows will lead to greater VPS utilization and workflow in your everyday operations of managing your server.
