What is Tailscale
Tailscale is a WireGuard-based modern VPN. Basically, it works as an overlay network in the computers between your networks — uses NAT traversal.
Its role is to be an exchange point of WireGuard public keys among Tailscale network nodes. It gives clients their IP addresses, sets the demarcation line between each user, allows users to share machines, and exposes your nodes' routes.
Based on private users or an organization, Tailscale assigns a user a private network (tailnet).
What is headscale?
Headscale is an open-source, self-hosted implementation of the Tailscale control server.
Headscale aims to implement a self-hosted, open-source alternative to the Tailscale control server. Headscale aims to provide self-hosters and hobbyists with an open-source server they can use for their projects and labs. It implements a narrower scope, a single Tailnet, suitable for personal use or a small open-source organization.
In this guide, we will be showing how to set up and run Headscale in a container.
Prerequisites
- Docker installed
- VPS
- FQDN (although only an IP can also be used)
- (Optional) Subdomain pointing to the IP of your VPS
Configure Headscale
First, make a directory on the host Docker node used to hold Headscale configuration and the SQLite database:
mkdir -p /root/.headscale/{config,lib,run}cd /root/.headscale/config
Then, Download the example configuration for your chosen version and save it as: /root/.headscale/config/config.yaml
The lines that will definitely need modifying are:
server_url- Here, you will need to set the domain with a subdomain preceding it, like headscale.example.com or IP. Append the port on which you will be running the service. listen_addr- For production, you will need to set this to your public IP, followed by the port.metrics_listen_addr- This is best kept on your local/private network. The default is already configured as such.tls_letsencrypt_hostname- This must be set to your server URL for the automatic TLS certificate. Omit if you are using only IP.base_domain- Defines the base domain to create the hostnames for MagicDNS. So if your URL is headscale.example.com, you will need to enter example.com
Run Headscale
After the configuration is complete, start the Headscale server.
docker run \
  --name headscale \
  --net=host \
  --detach \
  --volume "/root/.headscale/config:/etc/headscale" \
  --volume "/root/.headscale/lib:/var/lib/headscale" \
  --volume "/root/.headscale/run:/var/run/headscale" \
  --no-healthcheck \
  docker.io/headscale/headscale:<VERSION> \
  serve
Replace <VERSION> with the version of headscale you would like to run.
--health-cmd flag used to check health of containers requires the existence of /bin/sh , thus the health check automatically fails and the container is marked as unhealthy. Possible solutions for this would be to run a healthcheck from the host OS with the command docker exec -it headscale headscale health or making a custom container with sh included.
And finally, verify that Headscale is running:
Follow the container logs:
docker logs --follow headscale
If no errors occurred, you might get an output similar to this:

Verify running containers:
docker ps
Verify Headscale is available:
curl http://127.0.0.1:9090/metrics- If Headscale is running correctly, by running this command, you will get a lot of metrics regarding the container.
Post-Install Setup
We will use Tailnet as a client for our Headscale server.
We will create two users to test out connectivity between them.
docker exec -it headscale headscale users create user1

docker exec -it headscale headscale users create user2
We can take a look at the created users with the command:
docker exec -it headscale headscale users list
Register a machine (normal login)
To register a machine when running Headscale in a container, take the Headscale command and pass it to the container:
docker exec -it headscale \
  headscale nodes register --user <USER_ID> --key <YOUR_MACHINE_KEY>
Register a machine using a pre-authenticated key
Generate a key using the command line:
docker exec -it headscale \
headscale preauthkeys create --user <USER_ID> --reusable --expiration 24husers list command as shown above
This will return a pre-authenticated key that can be used to connect a node to Headscale
Downloading the client and logging in
Go to tailscale.com and download the client for your OS, then open a terminal (or PowerShell if you are running Windows) and run the following commands:
Authenticating using a pre-authenticated key:
tailscale up --login-server <YOUR_HEADSCALE_URL> --authkey <YOUR_AUTH_KEY>
Authenticating using a normal login
tailscale up --login-server YOUR_HEADSCALE_URL
We can run the command
docker exec -it headscale headscale nodes listTo check the nodes that are currently connected and their IPs. I have connected two nodes to Headscale.

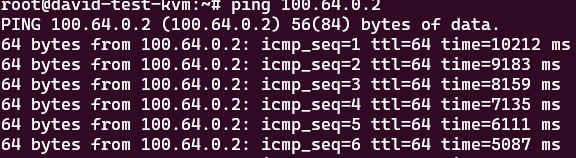
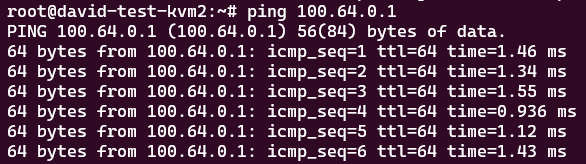
We can now run a simple ping test to determine if the setup is working.
Debugging headscale running in Docker
The headscale/headscale Docker container is based on a "distroless" image that does not contain a shell or any other debug tools. If you need to debug your application running in a Docker container, you can use the -debug variant, for example headscale/headscale:x.x.x-debug.
Running the debug Docker container
To run the debug Docker container, use the exact same commands as above, but replace headscale/headscale:x.x.x with headscale/headscale:x.x.x-debug (x.x.x is the version of Headscale). The two containers are compatible with each other, so you can alternate between them.
Executing commands in the debug container
The default command in the debug container is to run headscale, which is located at /ko-app/headscale inside the container.
Additionally, the debug container includes a minimalist Busybox shell.
To launch a shell in the container, use:
docker run -it headscale/headscale:x.x.x-debug sh
You can also execute commands directly, such as ls /ko-app In this example:
docker run headscale/headscale:x.x.x-debug ls /ko-app
Using docker exec -it allows you to run commands in an existing container.
Conclusion
In this guide, we successfully installed and configured a self-hosted Headcale Docker container. We also learned how to create users and connect to our Headscale node using Tailscale. Along the way, we touched on some intricacies in using a containerized Headscale. Now you are ready to establish WireGuard-based connections between your services!