Docker Compose is a CLI tool that allows you to run and manage multi-container Docker applications. It simplifies the process of running and coordinating multiple Docker containers as a single service.
Docker Compose allows you to define the configuration for your application's services, networks, and volumes in a YAML file.
For this tutorial, we are using an Ubuntu 22.04 VPS from AlphaVPS.
You will need to have Docker pre-installed on your system. For this, you can refer to our guide here.
How to install Docker Compose
The latest stable version of Docker Compose can be downloaded from its official GitHub repository. We can check the latest version here. Currently, at the time of writing this tutorial, it is v2.18.1.
To download the latest stable version, run the following commands, and do not forget to replace the version in the pathname of the URL.
mkdir -p ~/.docker/cli-plugins/
curl -SL https://github.com/docker/compose/releases/download/v2.18.1/docker-compose-linux-x86_64 -o ~/.docker/cli-plugins/docker-compose
Now we will need to set the correct permissions for the docker compose command.
chmod +x ~/.docker/cli-plugins/docker-compose
Now we can confirm the installation by running:
docker compose version
The displayed output will depend on your Docker Compose version, of course.
Docker Compose version v2.18.1
Docker Compose YAML file
YAML files are used to define the configuration of a multi-container Docker application. They specify services, networks, volumes, and other configuration options required to run the containers and define their relationships. It allows you to manage and orchestrate multi-container applications with a single configuration file.
Key components in a Docker Compose YAML file:
- Services: The services property refers to the different containers that form your application. Each service is defined as a separate section under the "services" key in the YAML file. Each service section lets you specify various properties such as the image, exposed port, environment variables, and volumes.
- Image: The image property specifies the Docker image to use for a container/service.
- Ports: The ports property lets you expose ports on the container. This is how we access the services, which run in the container.
- Networks: The networks property is where we specify how our services/containers will communicate with each other. You can define a network and then specify which services should be connected to it.
- Volumes: The volumes property lets you define volumes. They are used to persist data or share files between containers and the host machine. We specify the source and destination paths.
- Environment Variables: The property lets us specify environment variables, of course. They can be passed to our containers for their configuration.
- Dependencies: The
depends_onproperty lets us define dependencies between services. This ensures that certain services start before others.
Example YAML file
version: '3.7'
services:
  web:
    image: nginx:latest
    ports:
      - 80:80
    volumes:
      - ./html:/usr/share/nginx/html
  db:
    image: mysql:latest
    environment:
      - MYSQL_ROOT_PASSWORD=rootpass
      - MYSQL_DATABASE=mydb
      - MYSQL_USER=user
      - MYSQL_PASSWORD=password
    volumes:
      - ./data:/var/lib/mysql
Setting up a YAML file
In this step, we will create a new directory where we will operate.
Feel free to create it with the desired and navigate to it. In our case, we will name our work directory docker-compose.
mkdir ~/docker-compose
cd ~/docker-compose
Create the YAML file
nano docker-compose.yml
Here we can paste our example configuration from above.
From the component definitions above we learned that the volumes component in our file lets us persist data or share files between containers and the host machine.
volumes:
      - ./html:/usr/share/nginx/html
By defining this component we specify that the /usr/share/nginx/html directory of our service/container will be mapped to our html folder, whose location is relative to our working directory.
Let's create the html directory now.
mkdir htmlIn it, we will create a new index.html file, which our nginx service will process.
touch index.htmlYou can add the following content to your web page.
<!DOCTYPE html>
<html>
<head>
<title>Hello, World!</title>
</head>
<body>
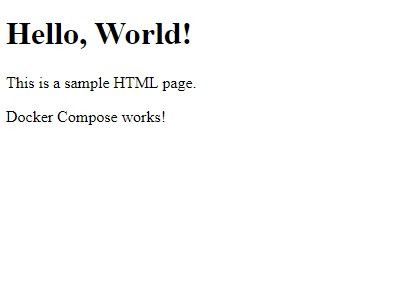
<h1>Hello, World!</h1>
<p>This is a sample HTML page.</p>
<p>Docker Compose works!</p>
</body>
</html>Running Docker Compose
With the previous step finished, you can now execute Docker Compose to bring your environment up.
We will need to run the following command:
docker compose up -dThe command downloads the necessary images, creates our containers, and run the environment.
Wait for the whole process to finish.
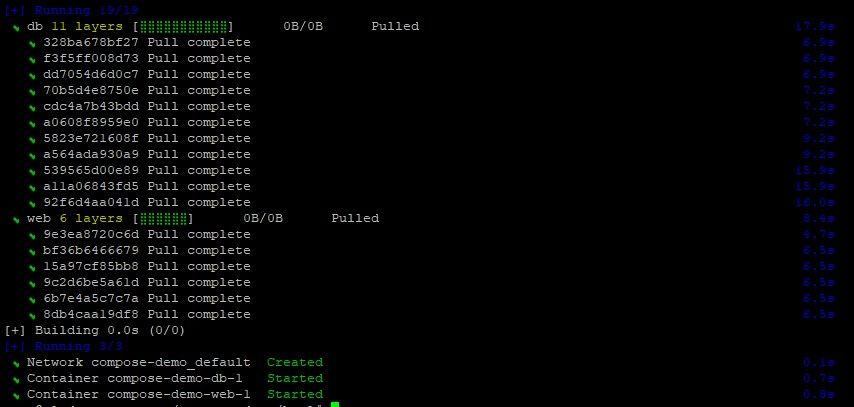
Your environment is now up and running in the background.
This can be confirmed by running:
docker compose psTo confirm that the web content is successfully served by Nginx, we can open up our browser and navigate to our server - simply type your VPS IP in the address bar.
You can easily check your IP address from your clients' area panel or CLI.
The ip addr command will list your network interface where the IP is present.
The content should be visualized in your browser as:
Docker Compose Commands
Docker Compose provides you with a set of commands to manage multi-container applications. Here are some commonly used Docker Compose commands:
docker-compose up: Creates and starts containers defined in your YAML file. The containers are started in the foreground, and you can see the logs of the running services.docker-compose down: Stops and removes the containers, networks, and volumes defined in your Docker Compose YAML file. It cleans up the resources created bydocker-compose up.docker-compose build: Builds or rebuilds the images for your services defined in the Docker Compose YAML file. It is used when you make changes to your Dockerfiles and want to update the container images.docker-compose start: Starts the containers that were previously created but stopped.docker-compose stop: Stops the running containers without removing them.docker-compose restart: Restarts the containers defined in the Docker Compose YAML file.docker-compose pause: Pauses the running containers, suspending their processes and CPU usage. You can usedocker-compose unpauseto resume them.docker-compose unpause: Resumes the paused containers, allowing their processes to continue.docker-compose ps: Lists the status of the containers defined in your Docker Compose file. It shows whether the containers are running or stopped.docker-compose logs: Displays the logs of the containers. By default, it shows the logs of all services. You can specify a specific service name to view its logs.